Description
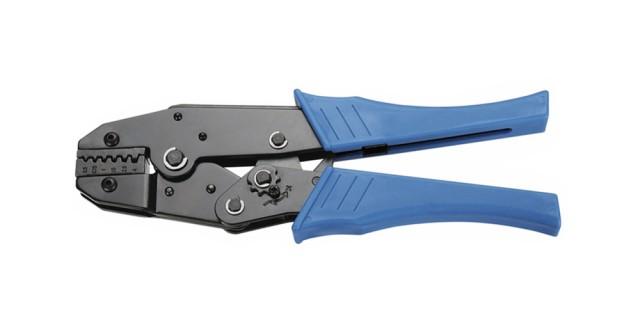
The Hyperion LX-06WF Universal Connector Crimping Plier is a essential and widely used tool in most electrical fitting jobs and is ideal for DIY projects. This manual crimper features insulated handles for easy gripping and will help crimp wires from 0.5-6.0mm² (10~20AWG) to different types of cable end sleeves and ferrules easily. This plier has a built in ratchet with auto disengage lever. As the handles are squeezed together, it will ratchet and prevent the jaws from opening back up. When enough pressure has been applied, the ratchet will disengage and release the crimped part ensuring a one piece strong connection. The wide spade jaws cover more surface area on the connector for proper crimping and comes with easy to read gauge markings for selecting proper wire & connector size.
There are hundreds of types of electrical connectors. In order to crimp connectors onto a wire, a special tool is required as shown in the picture and hence called Crimping Plier. Connectors may join two lengths of wire together or connect a wire to an electrical terminal. The word crimping in this context means to join two pieces of metal together by deforming one or both of them to hold the other. The deformity is called the crimp.
Features:
- Insulated handle for easy gripping
- Built-in ratchet with auto disengage lever
- Pressure selection choice as per connector & wire size
- Wide spade jaws with gauge markings
- Ideal tool for DIY projects
Included in the package:
- Hyperion LX-06WF Universal Connector Crimping Plier (0.5-6mm, 10~20AWG) x 1
Specifications:
- AWG: 20-10AWG
- Crimping Range: 0.5-6.0mm²
- Length: 190mm
- Weight: 370g
Note:
A good crimper when used correctly will make a cold weld between the wire and the barrel of the connector. If you were to cut a well executed crimp in half you would see a solid form of wire and connector.
A poor crimper leaves air pockets between the wire and connector. Air pockets allow moisture to collect, moisture causes corrosion, corrosion causes resistance, resistance causes heat, and may ultimately lead to breakage.
Crimping a Connector:
First, the correct size wire must be chosen for the terminal size, or vice versa. Next, strip the wire. The amount of exposed wire should be equal to the length of the metal barrel on the connector, usually around ¼” or so. If the stripped wire fits up into the metal portion of the barrel with little or no free space, the connector is the right size.
Remember: If the wire does not fit in the barrel, or is excessively loose, the wrong size of either wire or connector was chosen.
The wire should then be inserted until the insulation on the wire touches the end of the barrel. The wire and terminal are then inserted into the crimper. The color of the terminal’s insulation needs to be matched with the same color on the crimping tool. So if the terminal’s insulation is red, use the spot marked by the red dot on the crimpers. Alternatively, if the crimper does not have color markings, use the gauge markings on the side.
The terminal should be sitting horizontal with the barrel side up. The tool is then held perpendicular to the terminal and placed over the barrel, nearest to the ring (or other connection type). To finish the crimp, the tool is squeezed with a considerable force. In general, it is almost impossible to ‘over crimp’ a connection. After the crimp is completed, the wire and connector should still hold together after trying to pull them apart with great force. If the connection can be pulled apart, the crimp was not done correctly.