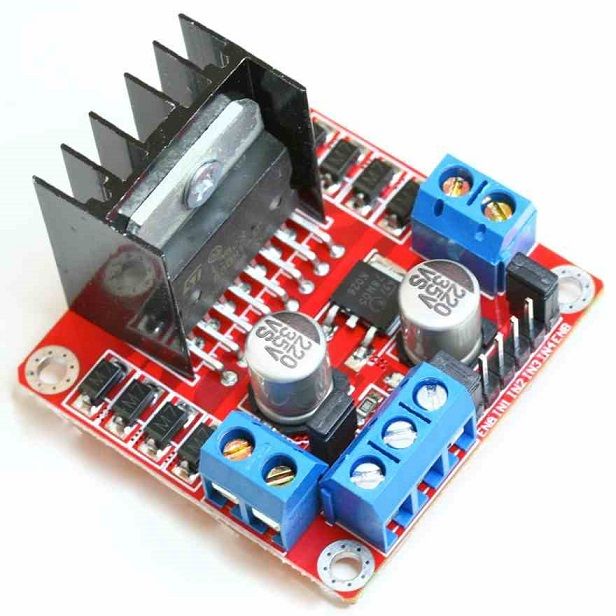
Description
Pins:
- Out 1: Motor A lead out
- Out 2: Motor A lead out
- Out 3: Motor B lead out
- Out 4: Mo (Can actually be from 5v-35v, just marked as 12v)
- GND: Ground
- 5v: 5v input (unnecessary if your power source is 7v-35v, if the power source is 7v-35v then it can act as a 5v out)
- EnA: Enables PWM signal for Motor A (Please see the “Arduino Sketch Considerations” section)
- In1: Enable Motor A
- In2: Enable Motor A
- In3: Enable Motor B
- In4: Enable Motor B
- EnB: Enables PWM signal for Motor B (Please see the “Arduino Sketch Considerations” section)
Specifications:
- Double H bridge Drive Chip: L298N
- Logical voltage: 5V Drive voltage: 5V-35V
- Logical current: 0-36mA Drive current: 2A (MAX single bridge)
- Max power: 25W
- Dimensions: 43 x 43 x 26mm
- Weight: 26g


Two things to mention;
- Make sure you have all of your grounds tied together; Arduino, Power source, and the Motor controller.
- The PWM Pins are unnecessary if you do not want to control PWM features.
The Arduino code sketch is pretty straight forward. Since there isn’t a library for the L298N Dual H-Bridge Motor Controller you just have to declare which pins the controller is hooked to.
The “int dir(number)Pin(letter)”‘ pins can be connected to any available digital pin you have available, as long as you declare the correct pin in your sketch. This makes the L298N Dual H-Bridge Motor Controller very versatile if your project is using a lot of Arduino pins.
The int“speedPin(letter)” pins need to be connected to a PWM pin on the Arduino if you want to enable speed control through PWM.
This is a list of PWM pins for the main two types of Arduino’s:
- AT MEGA – PWM: 2 to 13 and 44 to 46. Provide 8-bit PWM output with the analogWrite() function.
- UNO – PWM: 3, 5, 6, 9, 10, and 11. Provide 8-bit PWM output with the analogWrite() function.
Arduino Sketch Example:
//Code by Reichenstein7 (thejamerson.com)

//Keyboard Controls:
//
// 1 -Motor 1 Left
// 2 -Motor 1 Stop
// 3 -Motor 1 Right
//
// 4 -Motor 2 Left
// 5 -Motor 2 Stop
// 6 -Motor 2 Right

// Declare L298N Dual H-Bridge Motor Controller directly since there is not a library to load.

// Motor 1
int dir1PinA = 2;
int dir2PinA = 3;
int speedPinA = 9; // Needs to be a PWM pin to be able to control motor speed

// Motor 2
int dir1PinB = 4;
int dir2PinB = 5;
int speedPinB = 10; // Needs to be a PWM pin to be able to control motor speed

void setup() { // Setup runs once per reset
// initialize serial communication @ 9600 baud:
Serial.begin(9600);

//Define L298N Dual H-Bridge Motor Controller Pins

pinMode(dir1PinA,OUTPUT);
pinMode(dir2PinA,OUTPUT);
pinMode(speedPinA,OUTPUT);
pinMode(dir1PinB,OUTPUT);
pinMode(dir2PinB,OUTPUT);
pinMode(speedPinB,OUTPUT);

}

void loop() {

// Initialize the Serial interface:

if (Serial.available() > 0) {
int inByte = Serial.read();
int speed; // Local variable

switch (inByte) {

//______________Motor 1______________

case '1': // Motor 1 Forward
analogWrite(speedPinA, 255);//Sets speed variable via PWM
digitalWrite(dir1PinA, LOW);
digitalWrite(dir2PinA, HIGH);
Serial.println("Motor 1 Forward"); // Prints out “Motor 1 Forward” on the serial monitor
Serial.println(" "); // Creates a blank line printed on the serial monitor
break;

case '2': // Motor 1 Stop (Freespin)
analogWrite(speedPinA, 0);
digitalWrite(dir1PinA, LOW);
digitalWrite(dir2PinA, HIGH);
Serial.println("Motor 1 Stop");
Serial.println(" ");
break;

case '3': // Motor 1 Reverse
analogWrite(speedPinA, 255);
digitalWrite(dir1PinA, HIGH);
digitalWrite(dir2PinA, LOW);
Serial.println("Motor 1 Reverse");
Serial.println(" ");
break;

//______________Motor 2______________

case '4': // Motor 2 Forward
analogWrite(speedPinB, 255);
digitalWrite(dir1PinB, LOW);
digitalWrite(dir2PinB, HIGH);
Serial.println("Motor 2 Forward");
Serial.println(" ");
break;

case '5': // Motor 1 Stop (Freespin)
analogWrite(speedPinB, 0);
digitalWrite(dir1PinB, LOW);
digitalWrite(dir2PinB, HIGH);
Serial.println("Motor 2 Stop");
Serial.println(" ");
break;

case '6': // Motor 2 Reverse
analogWrite(speedPinB, 255);
digitalWrite(dir1PinB, HIGH);
digitalWrite(dir2PinB, LOW);
Serial.println("Motor 2 Reverse");
Serial.println(" ");
break;

default:
// turn all the connections off if an unmapped key is pressed:
for (int thisPin = 2; thisPin < 11; thisPin++) {
digitalWrite(thisPin, LOW);
}
 }
 }
 }